Tuesday, December 18, 2012

Christmas Playlists

Several years ago, when iTunes and Amazon's music libraries started becoming extensive, I began a new holiday tradition - a compilation CD (or playlist).  Every year shortly after Thanksgiving, I listen to Pandora's holiday stations to get song ideas.  Then I purchase enough music to fill a CD, label it, and we enjoy it throughout the season.  I try to find a good mix of classic standards, relaxing instrumentals, and contemporary releases.  The songs are great to listen to in the car or to have on as background music during Christmas baking or present opening.  Now I have seven years worth of CDs and a pretty large library of tunes.  The CDs also make great stocking stuffers for friends and family.  My sister even checks with me each year to find out if I'm still continuing the tradition.  I thought if she and her family enjoy it so much, it might be fun to share my latest playlist with you (and include links so you can purchase the songs, too!).


2012 Christmas Playlist
  1. Happy Holiday/The Holiday Season - Andy Williams
  2. Joy To The World - Third Day
  3. Heaven Everywhere - Francesca Battistelli
  4. Christmas Comin' Round Again - Scotty McCreery
  5. Ding Dong Merrily On High/Chimes Reel (Medley) - Craig Duncan
  6. Let It Snow - Rhonda Vincent
  7. I'm Gettin' Nuttin' For Christmas - Shirley Temple
  8. Up On The Housetop - Gene Autry
  9. Angel's Dance - Cincinnati Pops Orchestra
  10. Where Are You Christmas - Faith Hill
  11. God With Us - Jeremy Camp
  12. Gabriel's Message - Sting
  13. Messiah Hallelujah Chorus - Alexander Vilumanis
  14. I Heard The Bells On Christmas Day - Frank Sinatra
  15. Mistletoe - Colbie Caillat
  16. Ar Hyd Y Nos (All Through The Night) - Joel Rosenberger
  17. I Wish You A Merry Christmas - Bing Crosby
  18. Fum, Fum, Fum - The Von Trapp Children
  19. Go Tell It On The Mountain - Big Daddy Weave
  20. Sing We Now Of Christmas - Pikes Peak Ringers
  21. O, Christmas Tree - Winter Solstice
  22. Have Yourself A Merry Little Christmas - Sarah McLachlan
  23. What Are You Doing New Year's Eve? - Nancy Wilson
 What fun Christmas traditions do you have that you enjoy every year?  Please comment and share!

Thursday, December 6, 2012

A Tradition Addition: Salted Caramel Bark

It's that time of year again.  Christmas baking.  The time when I make things I don't dare have around the house the rest of the year.  Peanut butter balls.  Munch-a Bunch-a Mix.  Cut-out cookies.  Raspberry thumbprint cookies.  Yummy stuff.  I always like to try a few new recipes because you just never know what you might be missing.  And did you know that Christmas cookie calories don't count?  Nope!  Not a one!

I was at Sam's Club a few weeks ago when some salted caramel bark caught my eye.  It was in the bakery, where all the stuff I would never consider buying (because I can make it!) is displayed.  It looked fantastic.  And I figured there HAD to be a recipe for salted caramel bark online.  And there was.  Happy me!


Salted Caramel Bark
From ShugarySweets.com
Printer-friendly copy

1/4 cup butter
1/4 cup brown sugar
1 1/2 Tbsp. milk
1/4 tsp. vanilla extract
1/2 cup powdered sugar
1/2 tsp. kosher salt (which I forgot to include)
16 oz. Vanilla Almond Bark or white chocolate
3/4 cup milk chocolate morsels
1 1/2 cup pretzels, broken

In a medium sauce pan, melt the butter.  Add brown sugar and milk.  Bring to a boil, stirring frequently.  Cook for 2 minutes.  Remove from heat and whisk in vanilla extract and powdered sugar.  Stir until smooth and set aside.

Melt Almond Bark (or white chocolate) in a double-boiler, being careful not to overheat.  Pour the melted candy on a parchment lined cookie sheet and spread evenly.

If necessary, reheat the caramel sauce to a drizzling consistency and pour over the melted Almond Bark.  Sprinkle with kosher salt (or, if you forget to, omit it).  Top with broken pretzels and press lightly into the bark.  Melt milk chocolate morsels in the microwave, stirring every 15-20 seconds to avoid overheating.  Drizzle over the bark.  Allow to cool completely before breaking into pieces and storing in a covered container.


Hubby said he could easily eat a whole container of this bark, which is about half the recipe.  Considering there are over 4000 calories in the entire thing, I would advise against it.  But then again, if I only make it once a year, so it is a possibility.  Needless to say, this salted caramel bark made it to the permanent Christmas rotation.  A new tradition!

Saturday, November 24, 2012

Caramel Apple Cider Fudge


Have you ever had a recipe that just would not work?  The recipe you follow to the letter but it still comes out all wrong?  This fudge started out that way.  In fact, I made it THREE times and it was wrong.  Every.  Time.  Frustrating!  But it sounded so good, I just had to try again.  And so, with a little tweaking and a whole lot of persistence, the fourth time was a charm.


Caramel Apple Cider Fudge
Adapted from Very Culinary
Printer-friendly copy

3 1/2 c. powdered sugar
1/4 c. apple cider
1/4 c. evaporated milk
1/2 c. butter
2 c. brown sugar, packed
1 tsp. vanilla extract
1 tsp. cinnamon
1/2 tsp. nutmeg
1/4 tsp. allspice
2/3 c. vanilla chips
2 Tbsp. Mrs. Richardson's Butterscotch Caramel Sauce, melted

Spray an 8x8 baking dish with non-stick cooking spray and set aside.  Measure powdered sugar into a large bowl and set aside.  Melt butter in a medium-sized saucepan over medium heat.  Add cider, evaporated milk, and brown sugar.  Stir to combine.  Bring to a boil, stirring frequently because it can easily scorch.  Add vanilla, cinnamon, nutmeg and allspice and mix thoroughly.  Remove from heat and pour butter mixture over the powdered sugar.  Add vanilla chips and stir to combine.  Press mixture evenly into baking dish.  Drizzle with melted caramel sauce and allow to cool completely in the refrigerator.  Cut into 64 bite-sized pieces.  Store in a sealed container in the refrigerator 

Saturday, November 3, 2012

Honey Roasted Almonds

It's funny how one's tastes change.

I have vivid memories from my childhood of being held captive and forced to eat zucchini pot pie.  Well, maybe not captive.  Or forced.  But I do recall not being allowed to leave the dinner table and go to the county fair unless said pot pie was eaten.  Enter ketchup.  Lots and lots of ketchup!

I'm still not a fan of zucchini pot pie (specifically the zucchini part, not the pot pie part), but I never in a million years would have imagined that one day I'd be voluntarily eating almonds.  And LIKING them, much less blogging about them and singing their praises.  But these almonds are good.  Really, really good.  Hubby tells me they really complement a glass of bourbon (as pictured below).  Not that I'd know, though, since bourbon just isn't my thing.  I'm finicky, in case you hadn't noticed.  


Honey Roasted Almonds (printer-friendly copy)

1 1/3 cup whole almonds, raw
1 Tbsp. + 1 tsp. Splenda
1 Tbsp. + 1 tsp. granulated sugar
1 tsp. Splenda brown sugar
1 Tbsp. Land O' Lakes Light Butter
1 Tbsp. honey
1/2 tsp. Kosher salt

Preheat oven to 325 degrees F.  Spray baking sheet with non-stick cooking spray and set aside.  Place almonds in a medium-size heat-resistant bowl and set aside.  Mix together both Splenda varieties and sugar in a small dish and set aside.  Stir together light butter, honey, and Kosher salt in a microwave-safe dish.  Heat in the microwave at 15-second intervals until the butter has melted and the mixture is bubbly.  Pour the honey mixture over the almonds and toss until the nuts are well-coated.  Place nuts on baking sheet and bake in preheated oven until well-browned, about 30 minutes.  Stir the mixture at 10-minute intervals to ensure even cooking.  Remove from oven and scrape nuts into a large heat-resistant bowl.  Sprinkle nuts with the sugar mixture and stir to evenly coat.  Allow to cool to room temperature.  Store in a sealed container.

It's amazing what you discover when you take a risk and try new (or old) things.  Next thing you know I'll be eating zucchini.  Or not.

Sunday, October 21, 2012

It's All About Caramel

Ice cream.  I love it.  In fact, it's my firm belief that a day without ice cream is like a day without sunshine.  It's also like a day without peanut butter.  Or chocolate.  But those are posts for another day.  This one is about ice cream.  Caramel and ice cream to be exact!

The weather is cooling down, but you can believe I'm still enjoying my daily dose of ice cream.  Pumpkin treats and desserts seem to be all the rage right now, for obvious reasons, but I've never been a big pumpkin fan.  Fall has me dreaming of harvest at Apple Hill, in El Dorado County, California, where orchards are plentiful and competition for business offers a huge variety of baked treats and yummy goodies.  I have very fond memories of the former Honey Bear Ranch that sold Pie Royale, the very best apple pie ever (no lie), served with vanilla ice cream and covered with caramel.  So when I came across a recipe for caramel apple ice cream, which combined my love of ice cream and transported me back to my retro autumn days, I knew I had to try it out!


Caramel Apple Ice Cream
Adapted from The Pioneer Woman and Cookies & Cups
Printer-friendly copy

For the caramel:
4 tablespoons Land O' Lakes Light Butter
1 cup brown sugar, packed
1/2 cup heavy cream
Pinch of Kosher salt
1 teaspoon vanilla extract

For the ice cream:
1 tablespoon Land O' Lakes Light Butter
1 tablespoon brown sugar
1/4 teaspoon cinnamon
Pinch of Kosher salt
2 small apples, cored, peeled and diced small
2 cups heavy cream
1/4 teaspoon Penzey's Baking Spice
1 14-oz. can sweetened condensed milk
1/2 cup caramel sauce (from above)

Mix light butter, brown sugar, heavy cream, and Kosher salt in a saucepan over medium low heat.  Cook while whisking gently for 5 to 7 minutes, until thicker.  Add vanilla and cook another minute to thicken further.  Turn off heat and pour sauce into a clean jar.  Refrigerate until cold.

Meanwhile, in a medium saucepan, melt butter.  Add brown sugar, cinnamon, salt, and diced apples and cook on medium-low until apples are soft (cooking time will vary, depending on the variety of apple used).  Set aside to cool.  In a medium-size mixing bowl, whisk together the cream and Baking Spice, beating until stiff peaks form.  Fold in the sweetened condensed milk.  Transfer mixture to the frozen bowl of an ice cream maker and process according to the manufacturer's directions.  When approximately 1-2 minutes of mixing remains, add in apples and caramel sauce.  Transfer ice cream to a freezer-safe container and place in the coldest part of your freezer, at least 6 hours or overnight.  Serve with additional caramel, if desired.

What is YOUR favorite fall treat?  Do you prefer pumpkin or would you rather eat apples?  I'd love to hear your comments!

Friday, October 5, 2012

Inspiration Re-Creation

Last month, we visited the Cheese Days Festival in Monroe, Wisconsin.  Hubby's mother grew up in Monroe, so it's a bit of a family tradition to attend the event held every other year.  Cheese Days is a celebration of the Old World tradition of cheese making, and is all about, you guessed it, cheese.

This year I discovered (and how I've missed it all these years remains a mystery) the BEST grilled cheese sandwich ever, a Master's Grilled Cheese.  The gooey cheese oozed out of the crispy bread and I had to break off the huge strings because my arms weren't long enough to stretch any further.  It.  Was.  Heavenly.

Another treat we enjoyed was fried cookie dough.  Just the idea made my mouth water.  Cookie dough?  Fried?  How could that possibly be bad?  Um, yes, please!  I have to say, though, what I was served wasn't quite what I expected...


The cookie dough was inside a wonton wrapper.  Now, don't get me wrong, it was good!  Definitely good.  But when I have an idea of how something should look and taste and it doesn't quite meet expectations, I feel the need to create it myself.

Which is how I arrived at this...


Fried cookie dough BALLS, which is how I imagined them.  Googling "fried cookie dough," I settled on a recipe that I thought could satisfy my inner cravings (and FYI, self-rising flour is a combination of all-purpose flour, salt, and baking powder -- see recipe here).  Using my own tried and true recipe for chocolate chip cookies, I substituted a half-cup of Egg Beaters for the two eggs to ensure the raw dough would safe to eat.  I dipped the dough balls in the batter, fried them up (outside on the patio in an effort to keep the house free of "fry smell," and yes, I'm aware that's kind of weird) and enjoyed.  The result was nearly exactly what I'd hoped for.  Warm and melted doughy goodness!  I'm glad I only made six, because I could have easily eaten more.  Way more. 

Keeping with the re-creation theme, I thought I'd try to make some grilled cheese sandwiches, too.  At the time, I wasn't certain which variety of cheese was used in the Master's sandwiches.  We had purchased some gourmet Muenster and some Monterey Jack from Brennan's Market in Monroe, so those were a given.  I also wanted to include American, because all good grilled cheese sandwiches should have American.  Just my opinion.  I figured the combination would get me where I wanted to go.

I started by making a loaf of artisan bread.

Which turned into this...


Admittedly, my version was not as good.  I didn't use full-fat butter.  I didn't have quite the right cheese (I later learned the original contained Brick).  But it was good.  And it did in a pinch, which is essentially what all cravings are!

Now if only I could recreate the fried cheese curds, I'd be in business.  I'd share a photo of my own, but we inhaled them so fast, I didn't get a chance to take one.  This is a Googled image, showing the actual fried curds from Cheese Days in all their glory...

In case you'd like to attend the next one, Cheese Days will be held again September 19-21, 2014, and it will be the 100th anniversary of the festival.

On another note, I'm adding brick cheese to my grocery list...

Monday, September 17, 2012

A ThredUP Trial

Bubba is growing up fast.  I often feel like I'm constantly on the hunt for a new wardrobe for him.  And just when I think he has enough chino shorts or warm sweaters for the season, he'll hand me another article of clothing that doesn't fit.  In fact, just last week we discovered ALL of his jeans are too tight.  And I thought his wardrobe was in good shape for school.  UGH!

Most of the clothes I buy for him are new, and because he's not too rough and tumble, they're usually still in fantastic shape by the time they're ready for the "too small" pile.  So then I have tons of perfectly nice clothes taking up space in ginormous bins.  I've tried consigning, but it is ridiculously difficult to get an appointment at our local children's resale store.  And the last time I took bins there, they lost over half my items.  Not cool.  Ebay is okay, but a bit of a hassle finding the right size box, weighing it, figuring out postage, yada, yada, yada.  And the last garage sale I had was entirely too much work for the return on investment.

What's a mom to do?

Enter ThredUP.com.  Formerly a children's clothing swap site, ThredUP is now an online resale shop.  I'm not exactly sure where I first heard of the company, but I thought I'd check it out.  This is how it worked:

1.  I ordered a bag online.  Normally there is a $4.95 deposit fee for the bag (which is like a giant FedEx plastic bag), but currently the deposit is being waived.

 2.  The bag arrived in the mail.  The instructions for how to return your items are included inside, along with a copy of the guidelines for what they will accept.  Items not accepted are recycled, so I only sent them items I was confident could be resold, because I knew I wouldn't get them back.

3.  I loaded up the bag with Bubba's clean (yet too small) clothes and dropped the bag at the local UPS Store.  ThredUP is located in California, and the bag ships ground, so it took several days for it to reach its destination.  UPS provided a tracking number so I could make sure the bag was headed in the right direction.


4.  I received an e-mail from ThredUP informing me that my bag had been received and the items were being processed.  A few days after that, I received another e-mail letting me know my bag had been processed and how much money was deposited in my ThredUP account.


5.  I followed the e-mail link and could see all my accepted items available for sale and the price for each item.  I could even see which items had already sold.

6.  As you can see, I made an okay amount of money, probably similar to what I would have made from my local consignment store (the upside being, thredUP didn't lose my items!).  Now I can either use that credit to find new-to-us gently used items for Bubba, or I can cash out and have the money deposited in my PayPal account.  I really like that option!

7.  Would I use thredUP again?  Maybe.  I'm in the process of selling aforementioned too-small jeans on eBay, so we'll see how much I make off that auction.  The jury is out on thredUP, but it is a nice alternative choice for reselling children's clothes!  Hats off for internet commerce!

Let me know...what do you do with clothing your family has outgrown?

Disclaimer:  This review is my entirely impartial, unsolicited opinion.  No compensation or other consideration was provided by thredUP.  And I'm sure my friend Michelle at The Thrifty Homemaker won't like me too much for this post, since she runs a consignment store in Oregon.  If only she were nearby, I'm sure I could weasel an appointment at her shop! :)

Wednesday, September 12, 2012

Pizza With A Twist...Or A Fold

It's the weekend, and once again time for our traditional meal of homemade pizza.  But Mike, our resident pizza maker, is away for work, so assembly of any pie would fall on my shoulders.  Sadly, this is not my forte (I'm the dough maker), so I decided it would be a good time to try making calzones instead.  Shockingly, in all our years of pizza making we've never (purposely) made calzones.  And while the calzones didn't necessarily look pretty (calzone assembly appears not to be a strength of mine either), they were chewy and cheesy and basically excellent, which was really the point!

Four-Cheese Calzones

Dough:
6 1/2 ounces warm (110* to 115*) water
1 tsp. sugar
1 1/2 tsp. active dry yeast
1 tsp. salt
1 Tbsp. olive oil
4 tsp. vital wheat gluten
2 1/3 cup all-purpose or bread flour (I prefer King Arthur brand)

Filling:
1/2 c. pasta sauce (I prefer Classico Tomato & Basil, which has 50 c./serving)
4 oz. shredded Italian-blend cheese
2 Sargento Provolone-Mozzarella cheese snacks, cut into pieces

Method:
In a large bowl, dissolve the sugar in the warm water.  Sprinkle the yeast on top of the water and let stand 10 minutes or until foamy.  Add the salt, olive oil, vital wheat gluten, and flour and mix until a dough forms.  Knead the dough until smooth or, if using a stand mixer, allow the machine to knead the dough on medium-low for about 5 minutes.  Cover the dough with a tea cloth and allow to sit in a warm, draft-free location for about 90 minutes.

When the dough has finished rising, preheat the oven to 450*.  Sprinkle corn meal on a pizza stone and place the stone on the center rack of the oven.  Divide the dough into four equal portions.

Stretch each portion into a small circle, about the size of a pie plate.

Evenly distribute the pasta sauce on each dough portion.  Repeat with the cheeses.

Fold each dough portion in half and pinch the seams together, forming a sealed taco shape.

 Gently place each calzone on the hot pizza stone.  Bake for 13-15 minutes, until the dough is golden and the cheese inside has melted.


Serves 4

Calories:  Approximately 428, depending upon variety and brands of pasta sauce and cheese

Wednesday, August 29, 2012

Perennials

I love flower gardens.  I like looking out my kitchen window at the varieties of colors and textures.  The blooms are like nature's smile.  But despite my enjoyment of flowers, I must admit that I do not have a green thumb.  At all.  My bulbs don't come up.  My herbs are ravaged by Japanese beetles.  The rabbits eat my single cucumber for lunch.  A plant whisperer I am not.

Case in point...Bubba brought home a sunflower sprout from school.  He set it on the window sill and watered it every day.  We watched it grow until it was too large for the little paper cup it was planted in.  I went out and bought a larger pot so we could let the plant get stronger and healthier before we moved it outside.  We were looking forward to seeing how tall it would get and maybe even harvesting sunflower seeds from it in the fall.  I very carefully transplanted it.  And then?  It died.  Kaput.  Curtains.  Bummer.  Hmm.  But no big deal, I said.  We'll get some more sunflower seeds, plant them in the bigger pot, and have even MORE plants!  So we did.  And what do you think happened?  Just guess.  Not a sprout.  Empty pot.  Nada.  Zilch.

This little experience just served to reinforce my love of perennials.  You plant them in the ground once and you're done. You don't have to continuously dig in the dirt (something I am unusually averse to), spring after spring, over and over.  They grow for you, automatically! And if you're lucky, they reseed and spread!  What a deal!

Some of my favorites...

Blanket Flowers (Gaillardia) 
I like blanket flowers because they bloom all summer, and they even look cool after they lose their petals (at least for a little while!).


Peony 
Peonies are as beautiful as roses, but without the work.  Unfortunately the flowers don't last very long, but they do make gorgeous bouquets!


Coneflower (Echinacea)
My coneflowers are one of the first plants to flower and the blooms last most of the summer!  I have a number of the classic purple plants, and I finally bought two of these raspberry-colored ones this year.  The plants are super hardy, too!


Sedum
I first saw sedum in my sister's yard and thought it was so unique.  The stalks and stems reminded me of an aloe vera plant.  I enjoy sedum because this particular variety blooms in the fall, when everything else is looking dead.  My plants are just showing the faintest hint of turning pink!


Black-Eyed Susan (Rudbeckia)
Black-Eyed Susan is super prolific, so it's a good thing I like it!  My plants bloom in July and usually last until fall (provided the weather isn't scorching hot and dry, like the summer of 2012).  They are thick and provide a lot of color!  They flowers remind me of a sunflower, which, as you now know, I have been not so lucky at growing...


That's a bit of my perennial garden.  It's a work in progress.  Now if only I could use my brown thumb for good.  Like getting rid of daylilies and dandelions!

Wednesday, August 15, 2012

Diaper Wreath

Back in May, I posted about a balloon wreath I made to hang on our front door to celebrate family birthdays.  I recently made another wreath, but it won't be hanging on our door, because this one was a baby shower gift!

My good friend Missy is expecting her first baby in October.  Since she's let us in on the name, I was even able to personalize the wreath for her!


How cute is this?!  And it was really simple to make.  This is what you'll need:
  • 1 wire wreath form (available at Michaels or Hobby Lobby)
  • 1 jumbo package of diapers (I used size 2, with 36 diapers)
  • Ribbon (I used about 9 yards)
  • Adhesive chipboard letters
  • Assorted baby items (pacifiers, teething toys, etc.)
Unfold the first diaper so it is a long rectangle.  Don't open it up all the way.  Place the wreath form into the diaper so the wire is on the diaper's crease (the bottom center, where the front and back of the diaper meet).  Cut a 10" piece of ribbon and tie it around the top of the diaper, securing it to the wreath.  Continue with more diapers, until the wire wreath is completely covered.  You can either overlap the diapers or pack them tightly on the form, whichever you visually prefer.  For more visuals of the procedure, check out this tutorial.

When you have completely wrapped the wreath in diapers, cut an 18-inch piece of ribbon and attach it to the wreath, behind the diapers, so it forms a loop.  Tie it off.  This is how the wreath will hang. 

Stick the chipboard letters directly to the diapers, then attach the baby items (I used white thread to do this, but you could also use some of the ribbon).   Now you have a gift to welcome the new arrival that is super useful, too!

Monday, August 13, 2012

Baked "Fried" Pickles

I was washing dishes last night and was hit by a craving.  I don't have any idea why, but I decided that before I finished cleaning the kitchen, I should give into my whim and make them. Fried pickles.

I think I first heard about fried pickles on The Food Network, the source of all things unhealthy (hello Paula Deen and Guy Fieri), and my first taste of them was from Buffalo Wild Wings on my birthday last year.


The Buffalo Wild Wings fried pickles were just okay.  I wasn't overly impressed.  Plus, they were actually fried, so not altogether healthy.  I needed to try them again, but from another source.

On my quest, I pinned a number of recipes to my Pinterest board, should the urge to make fried pickles ever strike.  And when it did last night, I was ready.

As luck would have it, I even had all the ingredients.  This also explains many of the random ingredients in my pantry.  I'll see a recipe and buy the ingredients for it, but then the whim passes (or, more likely, I've moved on to another craving) before I have the opportunity to make it.  I still can't remember the recipe the fish sauce is for, but I have it, just in case.  But I digress... 


Baked "Fried" Pickles
Printer-friendly copy

Ingredients:

1 jar pickle chips
1/2 cup Egg Beaters
1/3 cup all-purpose flour
1 tablespoon Worcestershire sauce
1 teaspoon hot sauce
1 teaspoon garlic powder
1 teaspoon Penzey’s Forward seasoning, or your favorite spice blend
1 teaspoon ground black pepper
1 1/2 cups panko bread crumbs

Directions:
Turn oven broiler on high and place one oven rack in the highest position.  Drain juice from the pickles and place them on a plate lined with several paper towels to soak up any extra juice.  In a small bowl or dish, whisk together the Egg Beaters and flour.  Add the Worcestershire sauce, hot sauce, garlic powder, seasoning, and pepper and mix well.  Place bread crumbs in a shallow dish.  Dunk pickle chips in the batter, then dredge in the bread crumbs.  Place chips on a cookie sheet coated with non-stick cooking spray.  Broil chips for 2-3 minutes, then remove the cookie sheet from the oven and turn each chip over.  Broil for an additional 2-3 minutes.  Serve with ranch dressing and/or mustard.


The result?  Quite tasty, and these baked chips totally satisfied my craving.  I recommend eating the pickles while hot though, because they're not so good cold.  Just so you know. 

Sunday, July 29, 2012

A Hot Summer Calls For An Icy Drink!


Today isn't bad, at least in our neck of the woods, but this has been a ridiculously. hot. summer.  And when I relax with an adult beverage in the evening, a warm red wine doesn't do a thing to mellow me when it's so uncomfortably toasty!  Usually, I make myself some variation of Hungry Girl's Magical Low Calorie Margarita.  I'll swap out the tequila for vodka or rum, and change the Crystal Light Lemonade to Crystal Light Peach Mango or Hawaiian Punch Berry Blue Typhoon (available at WalMart), which reminds me a lot of a "grown-up" Icee.  Recently, though, we had house guests who left behind an almost-full bottle of Beringer White Merlot.  Not my favorite (at all), but it seemed a shame to let all that (okay) wine go to waste.  So I decided to try something.  I call it the...


Skinny Raspberry Merlot Cooler

1/2 c. Sprite Zero
1/2 c. White merlot
1 on-the-go package Crystal Light Raspberry
3-4 c. ice cubes

Place all the ingredients in a blender.  Pulse 20 times, then blend on high for up to 1 minute.  Pour into a glass and enjoy!

Calories:  About 90.  Yay!   
  

Tuesday, July 17, 2012

If You Can't Stand The Heat, Get Out And GRILL!

Lately it's just been too hot to heat up the kitchen, so our grill has been working almost every night.  We usually just sprinkle our favorite Penzey's herbs on our meat, but then I remembered a tried and true favorite, Magical Mediterranean Marinade, from Weber's Big Book of Grilling.  We've used it time and time again with great results.  If you have fresh herbs, they're always the best (provided pests like Japanese Beetles haven't decimated your itty-bitty container garden, but that's a story for another day).  Dried herbs will work fine, too.  Either way, this is a great way to liven up steak, chicken, and even veggies on the grill so you can keep your kitchen...and your house...cool!


Magical Mediterranean Marinade
Adapted from Weber's Big Book of Grilling by Jamie Purviance and Sandra S. McRae
Printer-friendly copy

2 tablespoons extra-virgin olive oil
2 tablespoons chopped fresh rosemary (or 2 teaspoons dried rosemary)
1 tablespoon chopped fresh thyme (or 1 teaspoon dried thyme)
1 tablespoon minced shallots (or 1 teaspoon freeze-dried minced shallots)
1 tablespoon Balsamic vinegar
1 tablespoon whole-grain or Dijon mustard
1 teaspoon minced garlic
1 teaspoon kosher salt
1 teaspoon ground black pepper

Whisk the ingredients together in a small bowl.  Place steak (or other desired meat) in a Ziploc bag, pour marinade over the meat and seal the bag.  Place bag into the refrigerator and allow to marinate at least one hour, or up to 12.  Pork and chicken can marinate for one to four hours, fish for 15 to 30 minutes, and veggies for no more than 15 minutes.  Makes about 1/2 cup.

Tuesday, June 26, 2012

Salted Nut Roll Bars

I realize I've been remiss in my blogging lately.  It's not that I haven't had anything to blog about (I actually have boatloads), but with hubby's recent surgery, Bubba's summer activities, and trying to transfer my blog files and photos to a new "cloud" server, it's just been C-R-A-Z-Y!

All excuses aside, I found this recipe online after seeing a similar one in a cookbook at Sam's Club.  Salted Nut Roll Bars.  I may be in the minority, but I've never actually consumed Salted Nut Roll candy bars before.  Perhaps it's because of the name.  Couldn't it sound a little more appetizing?  Or creative, at least?  But the photo in the cookbook looked really yummy, and when I saw the ingredients list in the recipe, well, I obviously had no idea what I was missing.  How can you go wrong with peanut butter chips, yellow cake, and marshmallows?  So now I wonder where these been all my life!


Salted Nut Roll Bars
Printer-Friendly Copy

1 box yellow cake mix
1 egg
3/4 cup melted butter, divided
3 cups miniature marshmallows
1 - 10-oz. bag peanut butter chips
1/2 cup corn syrup
1 tsp. vanilla
2 cups peanuts
2 cups crispy rice cereal

Mix the cake mix, egg, and 1/4 cup of the butter together. Press the crumbly batter into a greased 9 x 13 pan. Bake for 10-12 minutes at 350 degrees. Evenly distribute the marshmallows over the top of the hot crust. Return to the oven for 3-5 minutes, until the marshmallows are puffy. Meanwhile, melt the peanut butter chips, corn syrup, and remaining 1/2 cup of butter. Stir until smooth. Add the vanilla and blend in thoroughly. Add the peanuts and rice cereal and mix well. Pour the cereal mixture over the marshmallows and distribute as evenly as possible. Allow to cool thoroughly (or refrigerate) before cutting into 24 bars. Store in a sealed container.

Calories:  295 per bar (not light!!)

Tuesday, June 5, 2012

How We Celebrated...Part II

And now, what you've all been waiting on the edge of your seats for.  The conclusion of How We Celebrated...

Of course our celebration of Hubby's birthday included food.  Isn't that the highlight?

Hubby asked if I wouldn't mind whipping up a batch of cupcakes for him to take to work on his birthday.  Me, bake?  Twist my arm.  He selected my chocolate sour cream recipe with Madagascar Bourbon vanilla buttercream frosting.  I added the cupcake picks (from Hobby Lobby) myself, which were very basic.  I might try making some myself next time.


For his actual birthday cake, Hubby wanted his mom's recipe for "Crazy Cake."  It's basically an uber-moist, egg-less chocolate cake, similar to red velvet but without the food coloring.  The method for making it is a bit bizarre, but it is really, really good.  Unfortunately, we sort of ruined it by using a store-bought sugar-free vanilla frosting.  It really calls for a vanilla cream cheese frosting, so I'll try that instead next time.


At our house, the birthday person gets to choose the food that he or she wants for dinner.  I grew up with this tradition, which for me started by selecting lasagna and later turned to pizza.  And since these days I cook pretty much every night, the tradition has evolved into choosing a birthday restaurant.  Hubby chose a local pizza joint, Crust.


Crust is downtown and housed in an old wagon factory.  They serve a free appetizer known as pizza bites -- bits of fried pizza dough topped with cheese and dipped marinara sauce.  Bubba adores them, but I try not to fill up on the bites because I want to save as much room as I can for the main attraction, the pizza.  Crust also serves pastas and sandwiches, but we have only ever ordered the pizza.  I'm not generally a fan of thin crust pizza, but Crust's simple cheese pizza with extra cheese is just so yummy.  The cheese blend they use is amazing, perfectly salty, and there is lots and lots of it.  No other toppings required.  Hubby made a good choice!


I was so thrilled when the pizza arrived, I forgot to snap a picture.  Guess we'll have to go there again soon so I can get a good one...

Sunday, May 27, 2012

How We Celebrated...Part 1

Yes, it's been a few weeks since I blogged.  Although I have had lots to blog about, I wasn't feeling particularly inspired.  Then I had the brilliant idea to feature all the projects I was working on for Hubby's birthday this month, so I had to wait until that came and passed (since we sort of celebrated here and there all week).  And since we finally finished our birthday fun last night, I'm finally ready to write about what went on.  And I'm going to milk it, too, by featuring one item per blog.  Here goes...

1.  Birthday Wreath
Back in January, my friend Jacki blogged about a goal she had for the year - to have a new wreath on her front door each month.  And while I don't think I necessarily want a wreath all the time (after all, variety is the spice of life) I do like how welcoming a decorative hanging on the front door seems.  So I thought I'd try to meet Jacki's challenge.

Since I already had a Valentine door hanging as well as an Easter wreath in my collection, I thought it would be nice to have something to "Welcome Spring" to put up between the two occasions.  I found a cute design on Pinterest, so I followed the directions from the "Capture the Details" blog, and viola!  I was pretty happy with the result:


Following that success, I was ready for another challenge.  The next event:  Hubby's May birthday.  I found another wreath design online that I liked using un-inflated balloons and set out to recreate it.  I have to say, the birthday wreath was quite a bit more work (and quite a bit more costly, too).  The styrafoam wreath is wrapped in ribbon (which you can't even see, even though the ribbon was about $5) and there are almost 250 balloons on it, not to mention the "Happy Birthday" sticker and hat.  The little things added up quickly (although I suppose I could have made those items myself if I was super creative).   But since this wreath will be used three times each year, it's multipurpose (at least that's how I'm justifying it).  I really like how it looks:


Isn't it colorful?  I do think I'll add a few curly ribbons to it before we pull it out again for Bubba's birthday in July, and maybe stick a little gift ornament on it as well.

I was considering a patriotic wreath for the early summer to commemorate Memorial Day and Independence Day, but I think I might be a little burned out on crafts -- wreaths in particular -- for now.  So I found this at Kohl's for 60% off.


I think it will do...at least for now.

Sunday, May 6, 2012

A Good Excuse

I'm not sure where the idea came from, but I've wanted to try making homemade tortillas for a while.  So when Cinco de Mayo rolled around yesterday, it seemed like as good a time as any to go for it.  And I am so glad I did!  Despite the fact that I can't roll dough into any semblance of a circle to save my life, the tortillas were by far the coolest thing I've made in a while and they weren't difficult either.  We used them for tacos, and the flavor was so much better than store-bought tortillas.  The calories were quite a bit less, too.  I can't wait to try using fresh tortillas in enchiladas.  Yum.


Homemade Flour Tortillas
Adapted from Allrecipes.com
Printer-friendly copy

2 cups all-purpose flour, plus additional for dusting and rolling
1/2 teaspoon salt
1 teaspoon baking powder
1 tablespoon plain shortening
3/4 cups water

Whisk the flour, salt, and baking powder together in a mixing bowl.  Combine the shortening in with your fingers until the flour is crumbly.  Add the water, a little at a time because you might not need it all, and mix until the dough comes together.  Place on a floured surface and knead a few minutes until the dough is smooth and elastic, but not sticky.  Allow to rest for 15 minutes.  Divide the dough into 12 equal pieces and roll each piece into a ball.  Preheat a large non-stick skillet over medium-high heat.  Use a well-floured rolling pin and roll each dough piece into a thin, round tortilla.  Place the dough into the hot, dry (do not use cooking spray) skillet and cook until bubbly and golden; flip and continue cooking until golden on the other side.  Repeat until each piece is cooked, adjusting the temperature of the skillet as necessary.  Serve immediately or allow to cool and store in a sealed container.  Serves 12.


Tuesday, April 24, 2012

I Scream, You Scream

In case you were wondering, I have a sweet tooth.  Maybe a few of them.  And one of my favorite sweet treats has got to be ice cream.

Several years ago we bought a Cuisinart ice cream maker as an anniversary gift to ourselves.  At that time, I did all kinds of research, finding recipes for flavors I thought we would enjoy.  Most of the recipes included egg yolks, but because I've never been comfortable (or good at) tempering eggs, we generally used pasteurized egg whites.  This yielded results that were okay, but the ice cream was never as creamy as one can get from Edy's (known as Dreyer's out west) Slow Churned (my personal grocery store favorite).

But then I discovered Jeni Britton Bauer's Jeni's Splendid Ice Creams at Home, which details recipes from ice creams made at her artisan-style creameries based in Columbus, Ohio.  The great thing about Bauer's recipes is that she doesn't use eggs.  She relies on cornstarch and corn syrup to thicken her concoctions instead.  Needless to say, I had to try this method.

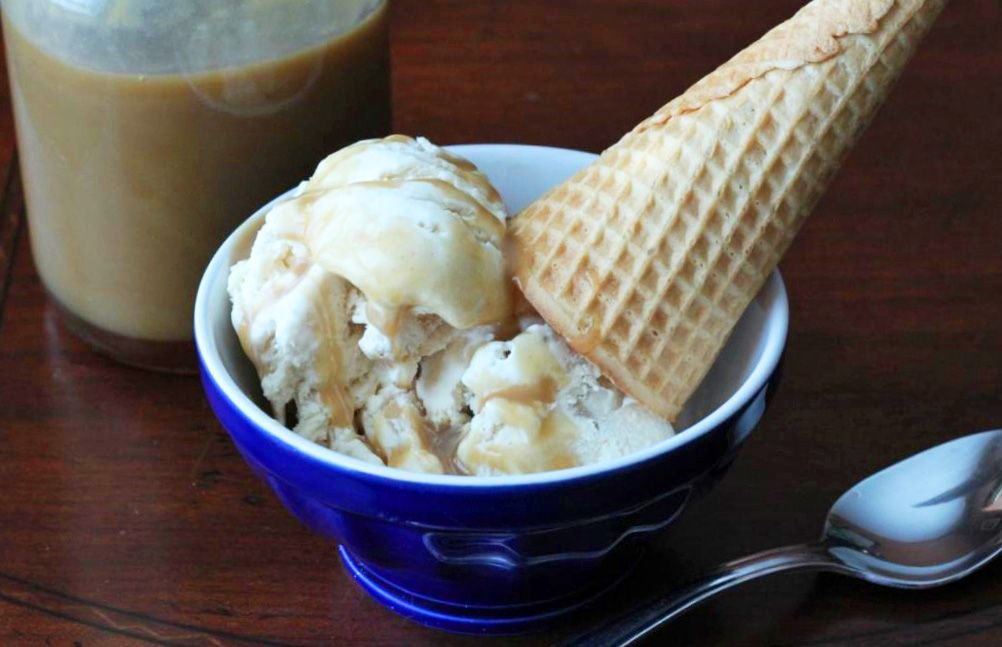
My first outing with this new method was a Madagascar Vanilla version of Bauer's Ugandan Vanilla Bean.  I'm generally not a huge fan of vanilla ice cream, but I figured it was a good place to start, especially since I already had some vanilla beans left from my homemade vanilla project (a post on that is upcoming).  The result?  The BEST vanilla ice cream I have EVER tasted.  Thick, creamy, rich, fabulous.  So I moved on to The Milkiest Chocolate in the World, before trying The Buckeye State (peanut butter and honey ice cream) and Gooey Butter Cake.  Each one of them was phenomenal.  Jeni Britton Bauer is my new hero!

One thing I really liked about Bauer's book was the ice cream base recipe she included.  It was very basic, and allows the ice cream creator to add flavors to his or her taste.  As she did not have a recipe for the Chocolate Chip Cookie Dough flavor, I decided that I would try that as my next attempt at an "original" flavor creation (the first was Birthday Cake -- yellow cake flavored ice cream with chocolate frosting mixed in -- a huge hit with my favorite 8-year old).  I tracked down a recipe for egg-free cookie dough (because what good is egg-free ice cream if there are eggs in the dough?) and I was good to go.  The result, of course, was amazing.  And now you can make some, too.  

Warning:  While this ice cream is lux, it is definitely not light!

Chocolate Chip Cookie Dough Ice Cream
Adapted from Jeni's Splendid Ice Creams at Home and Allrecipes.com
Printer-friendly copy


Ingredients:
Cookie Dough
2 1/2 tablespoons brown sugar
3 tablespoons granulated sugar
2 tablespoons light butter, softened
1/2 teaspoon vanilla extract
1 1/2 tablespoons milk
1/4 teaspoon baking soda
1/4 teaspoon salt
1/2 cup all-purpose flour
1/4 cup mini chocolate chips

Ice Cream
2 cups whole milk
1 tablespoon plus 1 teaspoon cornstarch
3 tablespoons (1 1/2 oz.) cream cheese, softened
1/8 teaspoon salt
1 1/4 cups heavy cream
2/3 cup granulated sugar
2 tablespoons light corn syrup
1 tablespoon vanilla

Directions:
In a medium bowl, mix together the brown sugar, granulated sugar, and butter until smooth.  Add vanilla, milk, salt, and baking soda, combining well, and then mix in the flour.  Add the mini chocolate chips and mix thoroughly.


Place the dough into a Ziploc bag or other freezable container and freeze overnight.  Follow the manufacturer's instructions and place the freezer bowl for the ice cream maker into the freezer to ensure it is completely frozen for mixing later.

Mix 2 tablespoons of the milk for the ice cream with the cornstarch in a small bowl, creating a slurry.  Set aside.


Whisk together the cream cheese and salt in a medium size spouted bowl or measuring cup (a 4-cup Pyrex measuring cup works well).  Set aside.


Combine the remaining milk, cream, sugar, corn syrup, and vanilla in a 4-quart saucepan.  Bring to a rolling boil over medium high heat, stirring as necessary to keep from scorching, and boil for 4 minutes.


Reduce heat slightly and stir if necessary to keep the mixture from boiling over.  Remove from the heat and gradually whisk in the cornstarch slurry.

Return the mixture to a boil over medium high heat and cook about 1 minute, stirring until slightly thickened.  Remove from the heat and gradually whisk the milk mixture into the cream cheese mixture, stirring until smooth.  Then pour the liquid into a 1-gallon Ziploc freezer bag.

 
Submerge the sealed bag in a large bowl filled with ice and water and allow to cool, about 30 minutes.  Add more ice as necessary.

After the mixture has cooled completed, clip one of the corners of the bag and drain the creamy blend into the frozen canister of an ice cream maker.  Allow to process until thickened, about 25 minutes.

While the ice cream spins, remove the cookie dough from the freezer and break into bite size chunks.


The ice cream and the cookie dough will alternate layers in a 1 1/2 quart freezable storage container, so place the first layer of cookie dough in the container at this time.  Pour the finished ice cream into the canister in layers with the dough, ensuring the layers are evenly spaced throughout.  Do not fill the container too full, as the ice cream will expand as it hardens.  Press a sheet of parchment paper directly against the ice cream and seal with an airtight lid.  Freeze until firm, at least 4 hours.

Makes about 1 quart
Calories: 229 calories per 2 oz. serving
Serves about 13

I also found Scoop by Ellen Brown, which includes many egg-free ice creams, along with traditional recipes that include egg yolks.  I'm definitely going to try making the Amaretto Peach ice cream and the Mango Mimosa Sorbet.

On another note, the cookie dough in this recipe is super yummy.  Some reviewers on Allrecipes said they mixed some up and kept it in the freezer just for snacking.  Not something I would recommend personally, but it's a thought!


Wednesday, April 18, 2012

Recipe Addiction?

I think I have a problem.  I'm pretty sure I might be possibly addicted to collecting recipes.

Case in point:  I have 443 recipes pinned on my Pinterest boards.  Four hundred and forty-three.  Yeah, that's a lot.  It would take me almost a year and three months to get through them all if I tried a new recipe e.v.e.r.y.  d.a.y.  And I'm sure I would have collected a few MORE new recipes by then.  Just a few.

And then there's my torn-out-of-magazines-printed-off-the-Internet-copied-from-books stack.  Er, stacks.  Wanna see?


And keep in mind, these are just recipes I want to TRY.  These are not recipes I have tried and kept or tried and discarded.  These are just "want" to try.  Hmm.  

Who's fault is this exactly?  Not mine.  Never mine.  I think this problem I have falls squarely on the shoulders of Pioneer Woman, Guy Fieri, Tastespotting and their blogging contributors, not to mention Cooking Light, Jeni Britton Bauer, King Arthur Flour, and probably all the executives at Food Network.  I'm fairly certain Emeril Lagasse started it all.  Shame on them.

So I'm attempting to deal with my issues.  Not by going cold turkey.  That's what I had been doing, and then I came home with three cookbooks from the library by America's Test Kitchen and Joy the Baker.  I've just discovered them.  Uh oh. Anyway, I'm going to try to at least organize my "to try" recipes.  Try being the operative word.  I have binders and tabs for all the recipes not currently found on my Pinterest boards, and I'm culling through them, weeding out anything that's too high in calories or uses hard-to-find ingredients or is similar to something I already have and like.  It's an arduous process.  Sort of like a hoarder parting with all their junk.  We shall see.  Wish me luck.

Friday, April 13, 2012

Lotsa Pasta

There is nothing quite like the taste of fresh homemade pasta.  Mike remembers his mother making pasta of all kinds when he was growing up, from fettuccine to ravioli.  Several years ago I gave him a pasta machine for Christmas and every so often we take a few hours and make up a small batch.  The pasta from this particular recipe is so tasty, you don't even need a sauce, although a fresh pesto sauce over the top would really be to die for!

Note:  In addition to the pasta machine mentioned above, you will also need a pasta drying rack.


Fresh Pasta
Adapted from Everyday Pasta by Giada De Laurentiis
Printer-friendly copy

Ingredients:
3 cups all-purpose flour
4 large eggs
1 tablespoon Kosher salt
1 tablespoon olive oil
2 tablespoons hot water

Directions:
Place the flour in the bowl of a stand mixer.  In a separate bowl, lightly beat the eggs.  Add the salt and olive oil to the eggs and stir.  Turn the mixer on low and slowly add the egg mixture to the flour.  Then add the water and mix until the liquid is evenly distributed.  The dough should begin to stick together, but it will not form a ball.

Turn the dough out onto a lightly floured surface.  Gather it into a ball and knead it gently until it is smooth. Cover the dough with plastic wrap and let rest at room temperature for about 30 minutes.

Cut the dough into eight even portions.  Using a pasta maker, set the thickness setting to level 1.  Feed the first portion of dough through the machine, cranking the handle clockwise to turn the rollers.  The dough will press into a sheet.  Catch it with your free hand and do not allow it to fold up on itself.  Once the dough has fed all the way through the machine, set the thickness dial to 2 and feed the dough through the rollers again.  Repeat until the desired thickness has been reached (about level 5 or 6).  Place the sheet of dough on a well-floured surface to rest and repeat the process with the other seven portions.  The cut the eight flattened pieces in half to make the dough sheets easier to manage as you form the noodles.

After all the dough portions have been rolled flat, fit the pasta maker's noodle attachment onto the machine.  Feed each flattened dough portion into the noodle cutting attachment, cranking the handle of the machine clockwise.  Catch the noodles with a free hand and carefully separate the pieces, hanging them to dry on a pasta drying rack.  Repeat this process with each of the dough sheets.  Allow the noodles to dry on the rack for about 2 hours.  Store dried pasta in a sealed container and freeze, if desired, or cook to al dente in boiling water for 5-7 minutes.

Makes 1 1/2 pounds of pasta
Serves: 6
Calories per serving:  290

This was SO yummy AND we have leftovers for another meal that I stashed in the freezer.  We really need to make pasta more often.  Note to self...next time, make a DOUBLE batch!

Tuesday, April 3, 2012

Bring on spring and bring on salad!

So as I mentioned in my last post, we've already begun grilling here in northeast Iowa.  Tonight we grilled burgers, which I often serve with veggies, sweet potato fries, or mashed potatoes.  I was in the mood for something fresh and "spring-y" though, so I flipped through my salad "favorites" binder and came to this recipe, which I made last year when I started my garbanzo bean kick (full of protein...gotta love 'em!).  It makes a great big bowl and we'll be able to eat leftovers with chicken or fish all week long!


Couscous-Garbanzo Salad
Adapted from Cooking Light

Ingredients:

Salad
1 chicken bouillon cube
1 cup water
1 cup uncooked couscous
1 cup grape tomatos, quartered
1 cup diced cucumber
1 cup celery, thinly sliced
1/2 cup diced carrot
1/2 cup diced red bell pepper
1 (15 1/2 oz.) can garbanzo beans, drained

Dressing
2 tablespoons extra virgin olive oil
2 tablespoons red wine vinegar
1 tablespoon fresh lemon juice
2 teaspoons Penzey's Pasta Sprinkle
1 teaspoon minced garlic
1/2 teaspoon Penzey's Shallots (or use dried minced onion)
1/2 teaspoon salt
1/4 teaspoon ground black pepper
1/4 teaspoon crushed red pepper

Directions:
In a medium saucepan, bring water and bouillon cube to a boil, then gradually stir in couscous.  Cover and remove from heat.  Let stand 5 minutes.  Place couscous in a large bowl and let cool completely.  Fluff with a fork.  Add tomatoes, cucumber, celery, carrot, bell pepper, and garbanzo beans and toss well.  In a small bowl, combine olive oil, red wine vinegar, lemon juice and spices and stir with a whisk.  Pour dressing mixture over the couscous mixture and toss gently.


Calories: 130  
Serves 10-12 (1/2 cup serving)